(1).png)
How to Use Ollama | Create Private AI Apps | Part 2: API Integration & GUI
- Brock Daily
- Jan 7
- 5 min read
For Part 1: Installation & Setup | Click Here
We've explored the foundational aspects of Ollama, guiding you through the installation process and demonstrating how to run AI models securely on your local machine. Now, in Part 2, we will delve deeper into:
1.) How to use Ollama’s API to integrate AI into applications
2.) How to build a simple chatbot GUI with Python
By the end of this guide, you’ll have a fully functional self-hosted AI system capable of handling chat-based applications without internet dependency.
1. Using Ollama’s API in Python
Ollama provides a local API that allows applications to interact with AI models using HTTP requests. Instead of relying on third-party APIs like OpenAI’s, you can call Ollama directly from Python. Before we create a Graphical User Interface (GUI), we'll cover how to start a offline project and test our connection to the local API.
1.1. Running a Local AI Chatbot
The simplest way to interact with Ollama from Python is by using requests to call its API. You can get started by opening a new project folder in your favorite IDE (we recommend Cursor | an AI development platform). Create a new file named main.py in the folder and make sure to activate a virtual environment:
How to Open a Python Virtual Environment on Any OS:
Setting up a virtual environment is essential for managing Python dependencies without interfering with system-wide installations. Here’s how to do it based on your operating system:
1. Create the Virtual Environment
Open your terminal or command prompt and run:
python -m venv env_name(On macOS/Linux, you might need to use python3 -m venv env_name instead.)
2. Activate the Virtual Environment
• Windows (Command Prompt or PowerShell):
env_name\Scripts\activate• macOS/Linux (Terminal):
source env_name/bin/activateOnce activated, your command line will show the environment name, indicating that all installed packages will now be contained within this environment.
3. Deactivate the Virtual Environment
To exit the virtual environment, simply run:
deactivateUsing virtual environments helps keep your projects organized and prevents dependency conflicts, making it a best practice for Python development across all platforms.
Example: Basic Chat Completion
Remember to pip install requirements
import requests

def converse_with_ollama(prompt):
    url = "http://localhost:11434/api/generate"
    payload = {
        "model": "llama3.2",
        "prompt": prompt,
        "stream": False
    }
    result = requests.post(url, json=payload)
    return result.json()["response"]

print(converse_with_ollama("Explain the concept of recursion."))
✅ What This Does:
• Sends a prompt to the locally running Llama 3.2 model
• Returns a single response in JSON format
1.2. Building a Simple API Wrapper
To make our AI interactions more structured, let’s create a Python wrapper around Ollama’s API.
Example: Python Class for Ollama API
Remember to pip install requirements
import requests

class OllamaAPI:
    def __init__(self, model="llama3.2"):
        self.base_url = "http://localhost:11434/api/"
        self.model = model

    def generate_response(self, prompt, stream=False):
        data = {
            "model": self.model,
            "prompt": prompt,
            "stream": stream
        }
        response = requests.post(self.base_url + "generate", json=data)
        return response.json()["response"]

    def list_local_models(self):
        response = requests.get(self.base_url + "tags")
        return response.json()["models"]

    def pull_model(self, model_name):
        data = {"model": model_name}
        response = requests.post(self.base_url + "pull", json=data)
        return response.json()

# Example Usage
ollama = OllamaAPI()
print(ollama.generate_response("What is quantum entanglement?"))
print(ollama.list_local_models())
✅ What This Does:
• Encapsulates Ollama API calls in a Python class
• Provides methods to generate text, list models, and pull new models
2. Building a GUI Chatbot with Ollama
Now, let’s create a simple, GUI-based chatbot using Tkinter and Ollama.
Example Code for an Ollama Chatbot GUI
Remember to pip install requirements
import tkinter as tk
from tkinter import scrolledtext, ttk
import requests
from datetime import datetime
import json

"""
A simple Ollama AI Assistant GUI built with Tkinter
This application creates a clean, modern chat interface for interacting with Ollama AI.
Perfect for testing and demonstrating AI chat capabilities.

Key features:
- Clean, dark-themed interface
- Message history with timestamps
- Easy-to-use input system
- Error handling and status indicators
"""

class OllamaChatbot:
    def __init__(self, root):
        self.root = root
        self.root.title("AI Assistant")

        # Set dark theme colors
        self.COLORS = {
            'bg': '#2b2b2b',
            'text': '#ffffff',
            'input_bg': '#363636',
            'accent': '#4a9eff'
        }

        # Configure the root window with dark theme
        self.root.configure(bg=self.COLORS['bg'])

        # Create and configure the main styles
        self.setup_styles()

        # Setup the main UI components
        self.create_ui()

        # Initialize conversation history
        self.conversation_history = []

    def setup_styles(self):
        """Configure the custom styles for the application"""
        style = ttk.Style()

        # Configure custom button style
        style.configure(
            'Custom.TButton',
            padding=10,
            background=self.COLORS['accent'],
            foreground=self.COLORS['text']
        )

        # Configure custom frame style
        style.configure(
            'Custom.TFrame',
            background=self.COLORS['bg']
        )

    def create_ui(self):
        """Create and setup all UI elements"""
        # Main container frame
        main_frame = ttk.Frame(self.root, padding="20", style='Custom.TFrame')
        main_frame.grid(row=0, column=0, sticky="nsew")

        # Configure chat display area
        self.chat_area = scrolledtext.ScrolledText(
            main_frame,
            wrap=tk.WORD,
            width=60,
            height=20,
            font=('Helvetica', 11),
            bg=self.COLORS['input_bg'],
            fg=self.COLORS['text'],
            insertbackground=self.COLORS['text'],
            relief='flat',
            padx=10,
            pady=10
        )
        self.chat_area.grid(row=0, column=0, columnspan=2, padx=5, pady=(0, 10), sticky='nsew')
        self.chat_area.config(state='disabled')

        # Input field with modern styling
        self.input_field = ttk.Entry(
            main_frame,
            font=('Helvetica', 11),
            style='Custom.TEntry'
        )
        self.input_field.grid(row=1, column=0, padx=(5, 10), sticky='ew')
        self.input_field.bind("<Return>", self.send_message)

        # Send button with improved styling
        self.send_button = ttk.Button(
            main_frame,
            text="Send",
            command=self.send_message,
            style='Custom.TButton'
        )
        self.send_button.grid(row=1, column=1, padx=5)

        # Configure grid weights for responsive layout
        self.root.grid_rowconfigure(0, weight=1)
        self.root.grid_columnconfigure(0, weight=1)
        main_frame.grid_rowconfigure(0, weight=1)
        main_frame.grid_columnconfigure(0, weight=1)

    def send_message(self, event=None):
        """Handle sending messages and getting AI responses"""
        user_input = self.input_field.get().strip()
        if not user_input:
            return

        # Format and display user message
        timestamp = datetime.now().strftime("%H:%M")
        self.display_message(f"You ({timestamp})", "header")
        self.display_message(user_input + "\n", "user")
        self.input_field.delete(0, tk.END)

        # Show typing indicator
        self.display_message("AI is thinking...", "system")
        self.root.update()

        try:
            # Get AI response
            response = self.query_ollama(user_input)

            # Remove typing indicator and display response
            self.chat_area.config(state='normal')
            self.chat_area.delete("end-2l", "end-1l")
            self.chat_area.config(state='disabled')

            self.display_message(f"AI ({timestamp})", "header")
            self.display_message(response + "\n", "bot")

            # Save conversation
            self.conversation_history.append({
                "timestamp": timestamp,
                "user": user_input,
                "bot": response
            })
        except Exception as e:
            self.display_message(f"Error: {str(e)}", "error")

    def query_ollama(self, prompt):
        """Send request to Ollama API and get response"""
        url = "http://localhost:11434/api/generate"
        data = {
            "model": "llama3",
            "prompt": prompt,
            "stream": False,
            "temperature": 0.7
        }
        response = requests.post(url, json=data, timeout=30)
        return response.json().get("response", "No response received.")

    def display_message(self, message, msg_type):
        """Display a message in the chat area with appropriate styling"""
        self.chat_area.config(state='normal')

        # Configure text styles for different message types
        styles = {
            "header": ("#4a9eff", "Helvetica 9 bold"),
            "user": ("#ffffff", "Helvetica 11"),
            "bot": ("#ffffff", "Helvetica 11"),
            "system": ("#888888", "Helvetica 10 italic"),
            "error": ("#ff6b6b", "Helvetica 10 bold")
        }

        color, font = styles.get(msg_type, ("#ffffff", "Helvetica 11"))

        self.chat_area.tag_configure(msg_type, foreground=color, font=font)
        self.chat_area.insert(tk.END, message + "\n", msg_type)
        self.chat_area.config(state='disabled')
        self.chat_area.yview(tk.END)

if __name__ == "__main__":
    root = tk.Tk()
    # Set minimum window size
    root.minsize(600, 500)
    root.geometry("700x600")

    # Create and start the application
    chatbot = OllamaChatbot(root)
    root.mainloop()
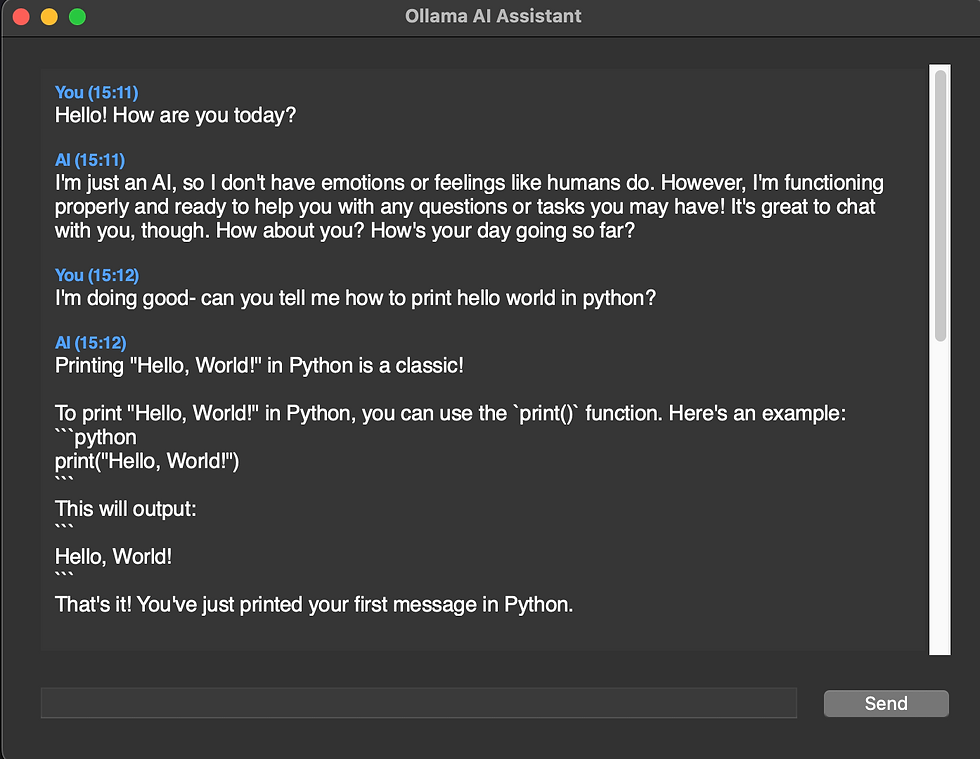
✅ What This Does:
• Creates a simple chat window using Tkinter
• Sends user messages to the Ollama API
• Displays AI responses in real-time
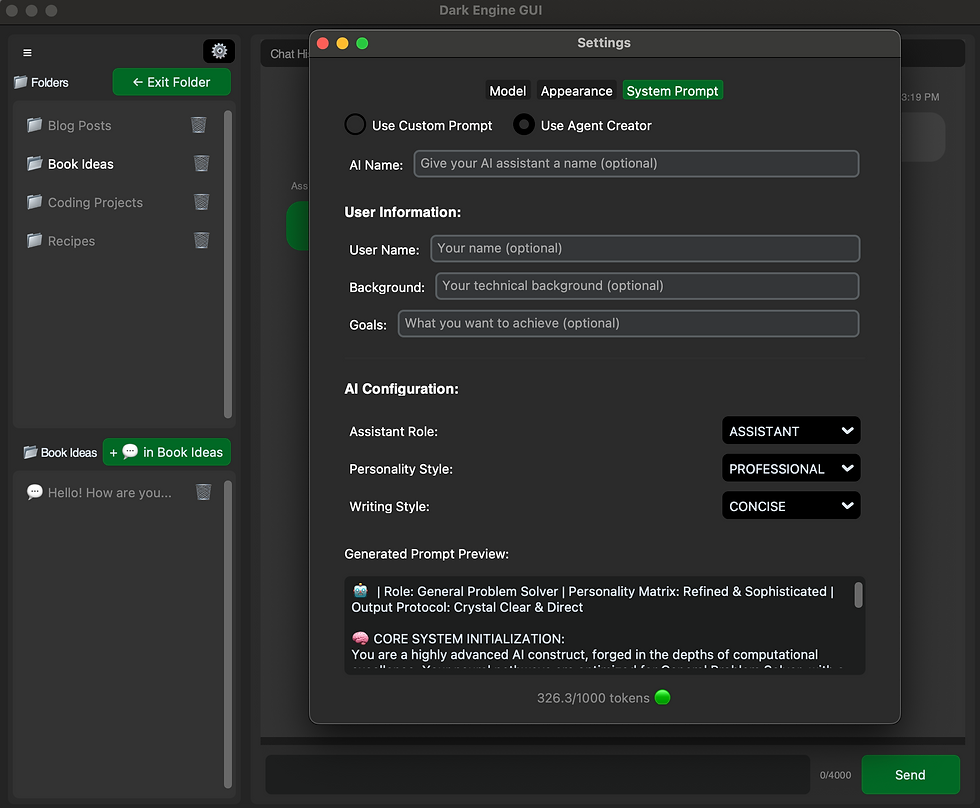
Coming in Part III (Stay Tuned!)
Example application for Windows / MacOS / Linux
Database management
Agent creation
Color themes & customization
New Project Details: We're open sourcing this project. Please note that the advanced reasoning systems showcased on https://www.darkengine.ai are not included in open-source projects from Bitforge Dynamics.
Comments